Homemade Chocolate Caramel Cups
Highlighted under: Flour & Frosting Recipes
I absolutely love making Homemade Chocolate Caramel Cups for friends and family. The combination of rich chocolate and gooey caramel is simply irresistible. These treats are perfect for any occasion, and they always impress everyone who takes a bite. Even better, making them from scratch allows me to control the sweetness and customize the flavors. I encourage you to give them a try, as they’re not only delicious but also quite fun to make. You’ll love how satisfying it is to create something delightful for your loved ones!
When I first attempted to create these Homemade Chocolate Caramel Cups, I was pleasantly surprised by how straightforward the process turned out to be. I experimented with different chocolates and discovered that using dark chocolate gives a delightful contrast to the sweetness of the caramel. The key to a smooth caramel is cooking it slowly, allowing the sugar to melt evenly without burning.
One tip I’ve learned along the way is to keep your caramel at a consistent temperature after it reaches the desired consistency. Pouring it into the chocolate cups before it cools ensures that you get that perfect gooey filling. Trust me, these little cups will become a regular fixture on my dessert table!
Why You Will Love This Recipe
- Rich chocolate flavor paired with gooey caramel.
- Customizable with your favorite nuts or flavors.
- Impressive yet easy to make for any occasion.
Mastering the Chocolate Layer
The first step is to effectively melt the dark chocolate chips, which is crucial for achieving that silky texture. I recommend using a microwave in 30-second intervals, stirring after each to prevent the chocolate from seizing. It should be glossy and smooth before pouring, so keep an eye on it to avoid overheating, which can lead to a grainy finish.
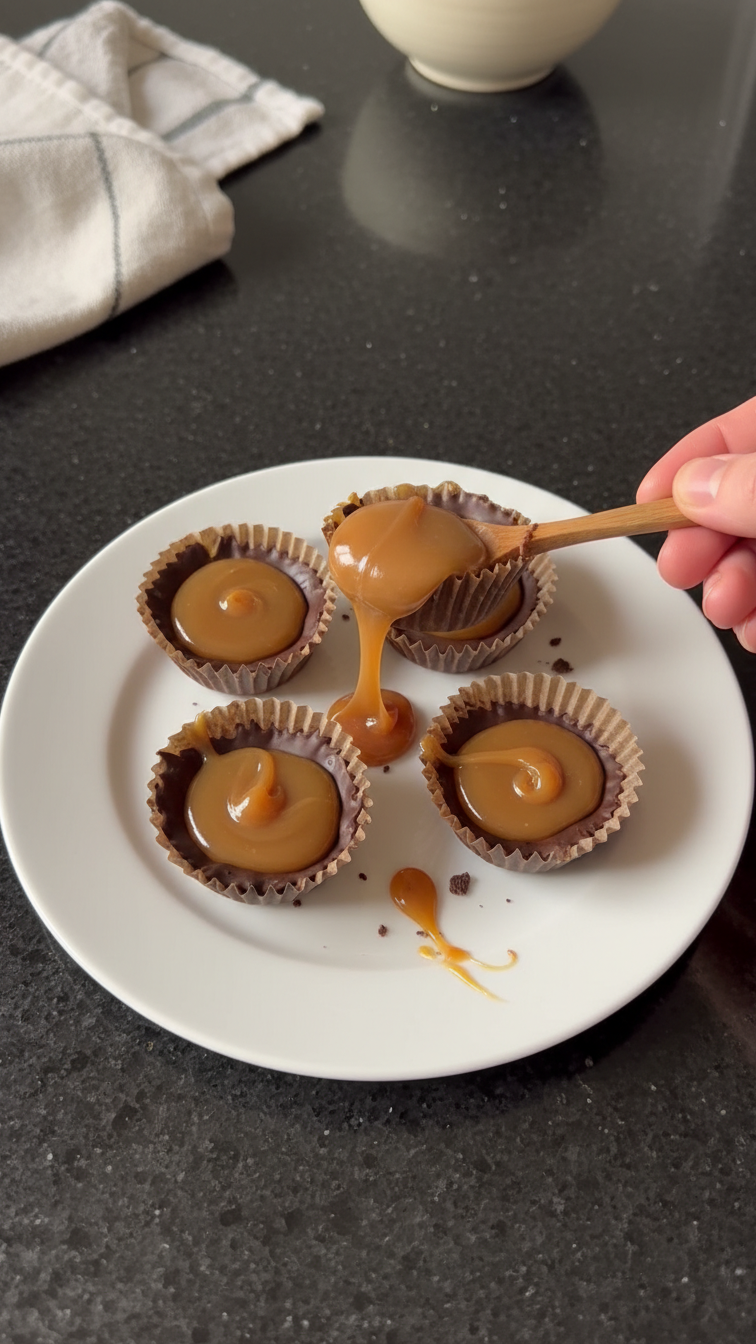
Using a silicone muffin tray is an excellent choice for this recipe because the flexible material allows for easy removal of the chocolate cups. Make sure to coat the sides of each cup evenly by tilting the tray as you pour in the melted chocolate. This technique ensures that your caramel filling will stay securely encased, retaining its gooeyness without leaking out.
Perfecting the Caramel
When making the caramel, patience is key. Cook the mixture over medium heat and stir constantly to avoid burning the sugar. You will know you've reached the soft-ball stage when a small amount of the mixture dropped into cold water forms a soft, pliable ball. This is essential for achieving that perfect chewy texture in your caramel.
Adding vanilla extract and sea salt at the end enhances the flavor profile remarkably. I recommend using high-quality vanilla extract for the best results, as it contributes a depth of flavor that pairs beautifully with the richness of the chocolate. The sea salt, on the other hand, helps balance the sweetness and elevates the overall taste of your treats, making them even more indulgent.
Customizing Your Cups
The beauty of these Homemade Chocolate Caramel Cups lies in their versatility. You can easily customize the recipe by adding your favorite nuts, such as pecans or almonds, to the caramel layer for added crunch. This not only enhances the textural contrast but also adds a delightful flavor complexity to each bite.
If you're looking for a healthier alternative, consider using dark chocolate with a higher cocoa percentage, as it typically contains less sugar. You can also substitute coconut cream for heavy cream to achieve a dairy-free version. Just ensure that you keep an eye on the consistency, as coconut cream can vary in thickness.
Ingredients
Gather these ingredients to get started!
Ingredients
- 1 cup dark chocolate chips
- 1/2 cup granulated sugar
- 1/4 cup unsalted butter
- 1/4 cup heavy cream
- 1/2 teaspoon vanilla extract
- 1/4 teaspoon sea salt
- 1/2 cup milk chocolate chips (for topping)
Once you have everything ready, you can start making these delicious treats!
Instructions
Follow these steps to create your own Homemade Chocolate Caramel Cups!
Melt the Chocolate
In a microwave-safe bowl, melt the dark chocolate chips in increments of 30 seconds, stirring in between until fully melted and smooth.
Prepare the Cups
Using a silicone muffin tray, pour a spoonful of melted chocolate into each cup, and tilt the tray to coat the sides evenly. Chill in the freezer for about 10 minutes.
Make the Caramel
In a saucepan, combine granulated sugar, butter, and heavy cream. Cook over medium heat, stirring constantly until it reaches a soft-ball stage (approximately 240°F or 115°C). Stir in vanilla extract and sea salt.
Fill the Cups
Remove the chocolate cups from the freezer and fill each with the caramel mixture, leaving a little space at the top.
Top with Chocolate
Melt the milk chocolate chips and pour over the caramel-filled cups to seal. Chill again until set.
Serve
Once fully set, remove the cups from the mold and enjoy your delicious homemade treats!
Enjoy your Homemade Chocolate Caramel Cups with family and friends!
Pro Tips
- For an extra touch, sprinkle coarse sea salt on top of the caramel before adding the final chocolate layer. This adds a delightful contrast to the sweetness!
Storage Tips
Once you've made your chocolate caramel cups, store them in an airtight container in the refrigerator to maintain their chewy texture and chocolate coating. They can last up to two weeks, but I recommend enjoying them within the first few days for the best flavor and texture.
If you’d like to make these ahead of time, you can freeze them as well. Arrange the chocolate cups on a baking sheet and freeze until solid before transferring them to an airtight container. When ready to enjoy, let them thaw in the fridge for a few hours—this prevents condensation from forming on the chocolate.
Serving Suggestions
These Homemade Chocolate Caramel Cups are perfect for dessert platters or as gifts in decorative boxes. For a fun twist during gatherings, consider serving them on a tiered display, which will elevate their presentation and entice your guests to indulge.
You can also pair these treats with a scoop of vanilla ice cream or a drizzle of caramel sauce for an impressive dessert option. They are the ideal balance of rich chocolate and gooey sweetness, making them an outstanding accompaniment to coffee or tea during an afternoon gathering.
Troubleshooting Common Issues
If you find your chocolate has seized during melting, it typically means that moisture got into the bowl. To salvage it, add a small amount of vegetable oil, and gently reheat while stirring until it's smooth again. This can rescue your chocolate and prevent waste.
Should your caramel turn too hard, this often occurs if it's cooked too long. To fix this, you can reheat it with a splash of cream to soften it back into a sauce. Always monitor the temperature closely using a candy thermometer to ensure you reach the desired consistency without going too far.
Questions About Recipes
→ Can I use milk chocolate instead of dark chocolate?
You can, but the flavor will be sweeter. Dark chocolate provides a nice balance with the caramel.
→ How do I store the chocolate caramel cups?
Store them in an airtight container in the refrigerator for up to one week.
→ Can I make the caramel ahead of time?
Yes, you can make the caramel ahead and store it in the fridge until you're ready to use it. Just reheat gently before filling the cups.
→ What can I add to the caramel for flavor?
You can add a pinch of cinnamon or a splash of bourbon for a unique twist to the flavor of your caramel.
Homemade Chocolate Caramel Cups
Created by: The Yummyvault Team
Recipe Type: Flour & Frosting Recipes
Skill Level: Intermediate
Final Quantity: 12 cups
What You'll Need
Ingredients
- 1 cup dark chocolate chips
- 1/2 cup granulated sugar
- 1/4 cup unsalted butter
- 1/4 cup heavy cream
- 1/2 teaspoon vanilla extract
- 1/4 teaspoon sea salt
- 1/2 cup milk chocolate chips (for topping)
How-To Steps
In a microwave-safe bowl, melt the dark chocolate chips in increments of 30 seconds, stirring in between until fully melted and smooth.
Using a silicone muffin tray, pour a spoonful of melted chocolate into each cup, and tilt the tray to coat the sides evenly. Chill in the freezer for about 10 minutes.
In a saucepan, combine granulated sugar, butter, and heavy cream. Cook over medium heat, stirring constantly until it reaches a soft-ball stage (approximately 240°F or 115°C). Stir in vanilla extract and sea salt.
Remove the chocolate cups from the freezer and fill each with the caramel mixture, leaving a little space at the top.
Melt the milk chocolate chips and pour over the caramel-filled cups to seal. Chill again until set.
Once fully set, remove the cups from the mold and enjoy your delicious homemade treats!
Extra Tips
- For an extra touch, sprinkle coarse sea salt on top of the caramel before adding the final chocolate layer. This adds a delightful contrast to the sweetness!
Nutritional Breakdown (Per Serving)
- Calories: 380 kcal
- Total Fat: 26g
- Saturated Fat: 15g
- Cholesterol: 195mg
- Sodium: 85mg
- Total Carbohydrates: 32g
- Dietary Fiber: 3g
- Sugars: 24g
- Protein: 6g